6-Minute Ankle Mobility Routine: 6 Drills For Better ROM
9 min read
Stiff ankles affect more than just your squat depth. Limited ankle range of motion can mess with your knees, hips, and lower back, and if you spend long hours on your feet at festivals, retreats, or anywhere that keeps you moving, you’ll feel it. A solid ankle mobility routine takes just a few minutes and can make a real difference in how your body handles prolonged standing, dancing, and uneven terrain.
At Afterglow Supplements, we think about recovery in the broadest sense, not just neurochemistry after a psychedelic experience, but the physical wear and tear that comes with the lifestyle. Sore, locked-up ankles the Monday after a weekend out are a signal your body needs attention. That’s why we put together resources like this: practical routines you can actually stick with.
Below, you’ll find six targeted drills that take roughly six minutes total. Each one addresses a specific limitation, whether it’s tight calves, restricted dorsiflexion, or general joint stiffness, so you can rebuild your range of motion systematically. No equipment required, and you can do them anywhere you have floor space.
1. Ankle circles
Ankle circles are the most accessible entry point in any ankle mobility routine. They require zero equipment, take under a minute, and wake up the joint by moving it through its full available range of motion before you layer in more demanding drills.
What it improves
Ankle circles train the joint to move freely in all directions, not just forward and back. Repeating slow, controlled circles helps lubricate the joint with synovial fluid and loosens the soft tissue around the talus. Over time, this translates to smoother, less restricted movement whether you’re squatting, hiking, or standing on uneven ground for hours.
Consistent circular movement is one of the simplest ways to maintain joint health without adding load or stress to surrounding tissues.
How to do it in 60 seconds
Sit on a chair or the floor with one leg extended. Lift your foot slightly so it’s free to move without friction. Rotate your ankle slowly in wide circles, ten rotations clockwise, then ten counter-clockwise. Switch feet. Keep the movement in the ankle, not the knee or hip.
Form cues that matter
Draw the biggest circle you can with your big toe on each rotation. Your shin and knee should stay relatively still throughout. Focus on slowing down through the end ranges, particularly pointing your toes fully forward and pulling them back toward your shin. Controlled end-range movement is where you actually gain new mobility.
Common mistakes to avoid
Most people rush through ankle circles and use only a fraction of their available range. Another common issue is letting the hip or knee compensate by rotating instead of keeping the movement isolated at the ankle. Sloppy circles train nothing; deliberate, wide circles are what create change.
Make it easier or harder
If the joint feels stiff or uncomfortable, start with smaller circles and gradually widen them as the tissue warms up. To increase the challenge, do your circles in a single-leg standing position instead of seated. This adds a balance demand and forces your stabilizing muscles to engage while the ankle moves.
2. Toe-to-heel rockers
Toe-to-heel rockers shift your body weight forward onto your toes and back onto your heels in a controlled rhythm. This simple rocking motion targets the full sagittal-plane range of your ankle and primes both the front and back of the lower leg for more demanding work in your ankle mobility routine.
What it improves
This drill builds active control through dorsiflexion and plantarflexion, the two most-used ankle movements in daily life. It strengthens the tibialis anterior along your shin as you rock back onto your heels, while simultaneously lengthening the calf complex as you rock forward.
Training both directions of ankle movement together is more time-efficient than isolating each separately.
How to do it in 60 seconds
Stand with your feet hip-width apart and your arms relaxed at your sides. Slowly roll forward onto your toes, pause for one second, then rock back onto your heels, lifting your toes off the ground. Repeat for 60 seconds at a controlled pace.
Form cues that matter
Keep your knees soft and slightly bent throughout the movement. Your weight should shift smoothly from front to back without any jerky transitions between the two end positions.
Common mistakes to avoid
Rushing the tempo is the most common error. Moving too fast lets you rely on momentum rather than muscle control, which cuts the training effect significantly and reduces time spent at end range.
Make it easier or harder
Perform the drill near a wall for balance support if needed. To increase the difficulty, slow your tempo to a three-second count in each direction.
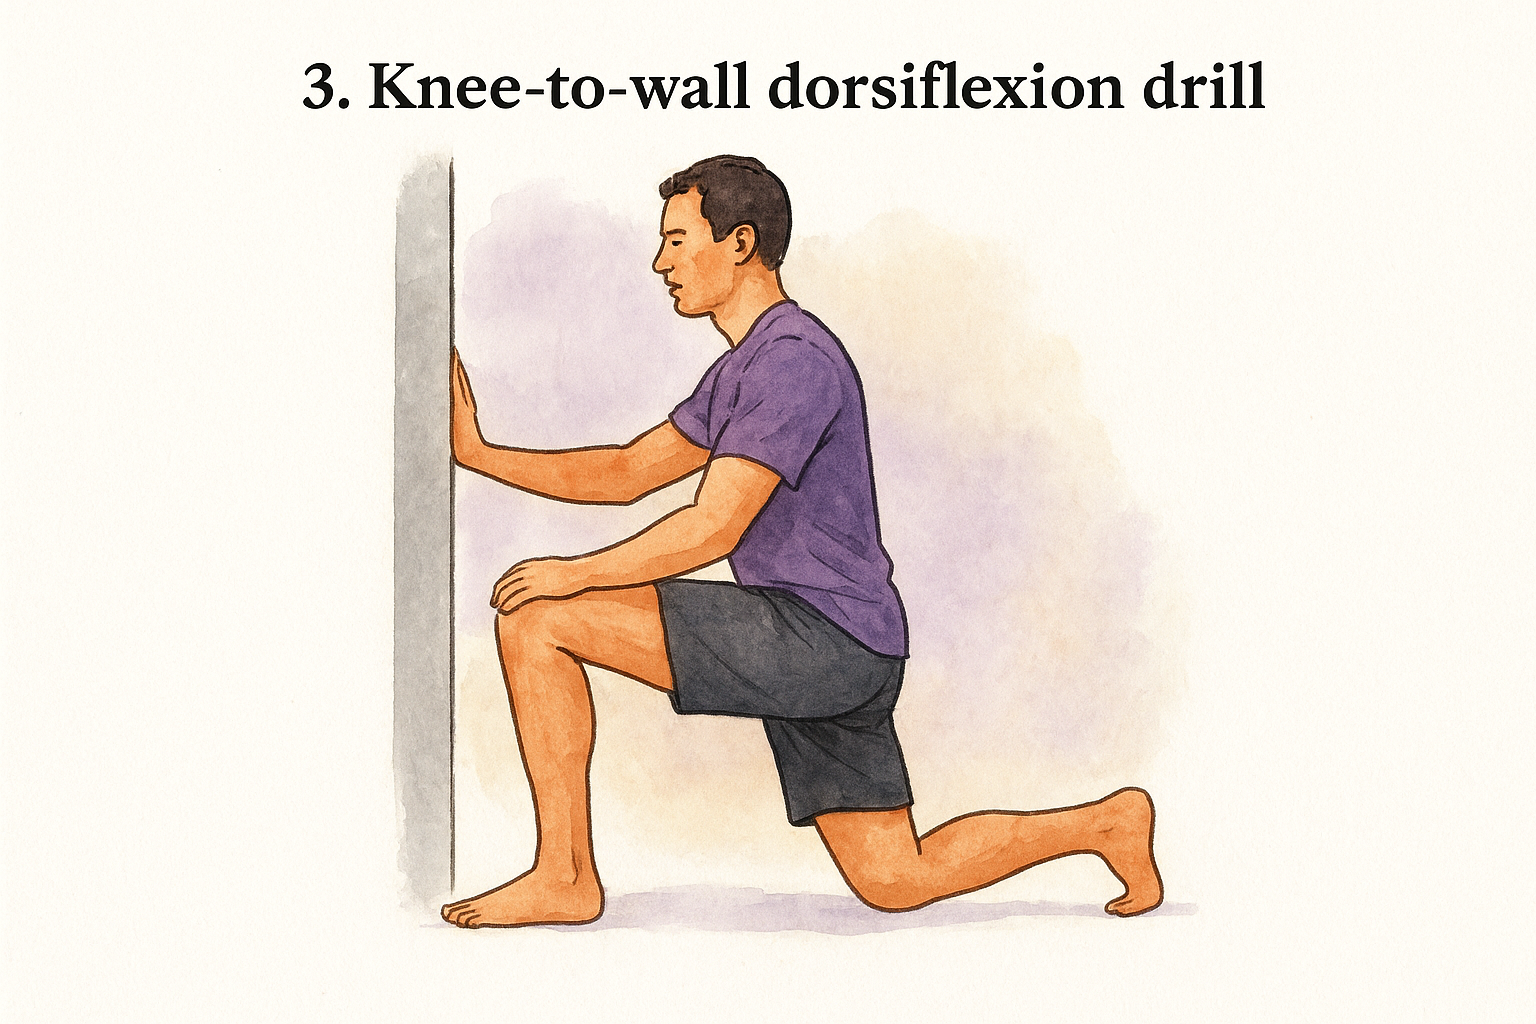
3. Knee-to-wall dorsiflexion drill
The knee-to-wall drill is the most direct way to measure and improve ankle dorsiflexion, which is your ankle’s ability to flex toward your shin. This is the movement that limits squat depth and puts excess stress on your knees when restricted, making it one of the most targeted drills in any ankle mobility routine.
What it improves
This drill directly targets dorsiflexion range of motion by stretching the calf, Achilles tendon, and ankle joint capsule at the same time. Improving this one movement pattern has clear downstream effects on your squat, lunge, and stair mechanics.
How to do it in 60 seconds
Stand facing a wall with one foot about four to five inches away. Drive your knee forward toward the wall while keeping your heel flat on the floor. Touch the wall with your knee, slide your foot back slightly, and repeat. Work one foot for 30 seconds, then switch.
The closer your foot is to the wall when your knee touches it, the better your dorsiflexion range.
Form cues that matter
Keep your heel pressed firmly into the floor on every rep. Your knee should track over your second toe, not collapsing inward during the drive.
Common mistakes to avoid
Letting your heel lift is the most common error. Raising the heel defeats the purpose because it bypasses the restriction you are actually trying to address.
Make it easier or harder
Start with your foot further from the wall if your range feels very limited. Move it progressively closer as your mobility improves to keep the drill challenging.
4. Step heel drops and calf raises
Step heel drops and calf raises use a simple elevated surface to move your ankle through a greater range than flat-ground exercises allow. Adding this drill to your ankle mobility routine builds both flexibility and functional strength in the same movement.
What it improves
This drill targets the entire calf complex, including the gastrocnemius and soleus, through an extended range of motion. Dropping below the level of the step lengthens the Achilles tendon and ankle joint in a way that flat-surface stretches rarely achieve.
Training your calf muscles through a full range, not just the middle portion, produces more lasting mobility gains over time.
How to do it in 60 seconds
Stand with the balls of your feet on the edge of a step and your heels hanging off. Lower your heels slowly below the step level, pause for one second, then rise up onto your toes. Perform 10 to 12 reps on each foot within the 60-second window.
Form cues that matter
Keep your knee straight during the heel drop to bias the gastrocnemius, or bend it slightly to target the soleus. Lower under full control rather than dropping quickly.
Common mistakes to avoid
Bouncing at the bottom cuts the stretch short and increases injury risk. Let your heel sink slowly and deliberately to get the most out of each rep.
Make it easier or harder
Use both feet simultaneously if single-leg feels unstable. To increase difficulty, add a light dumbbell held at your side for extra resistance on the way up.
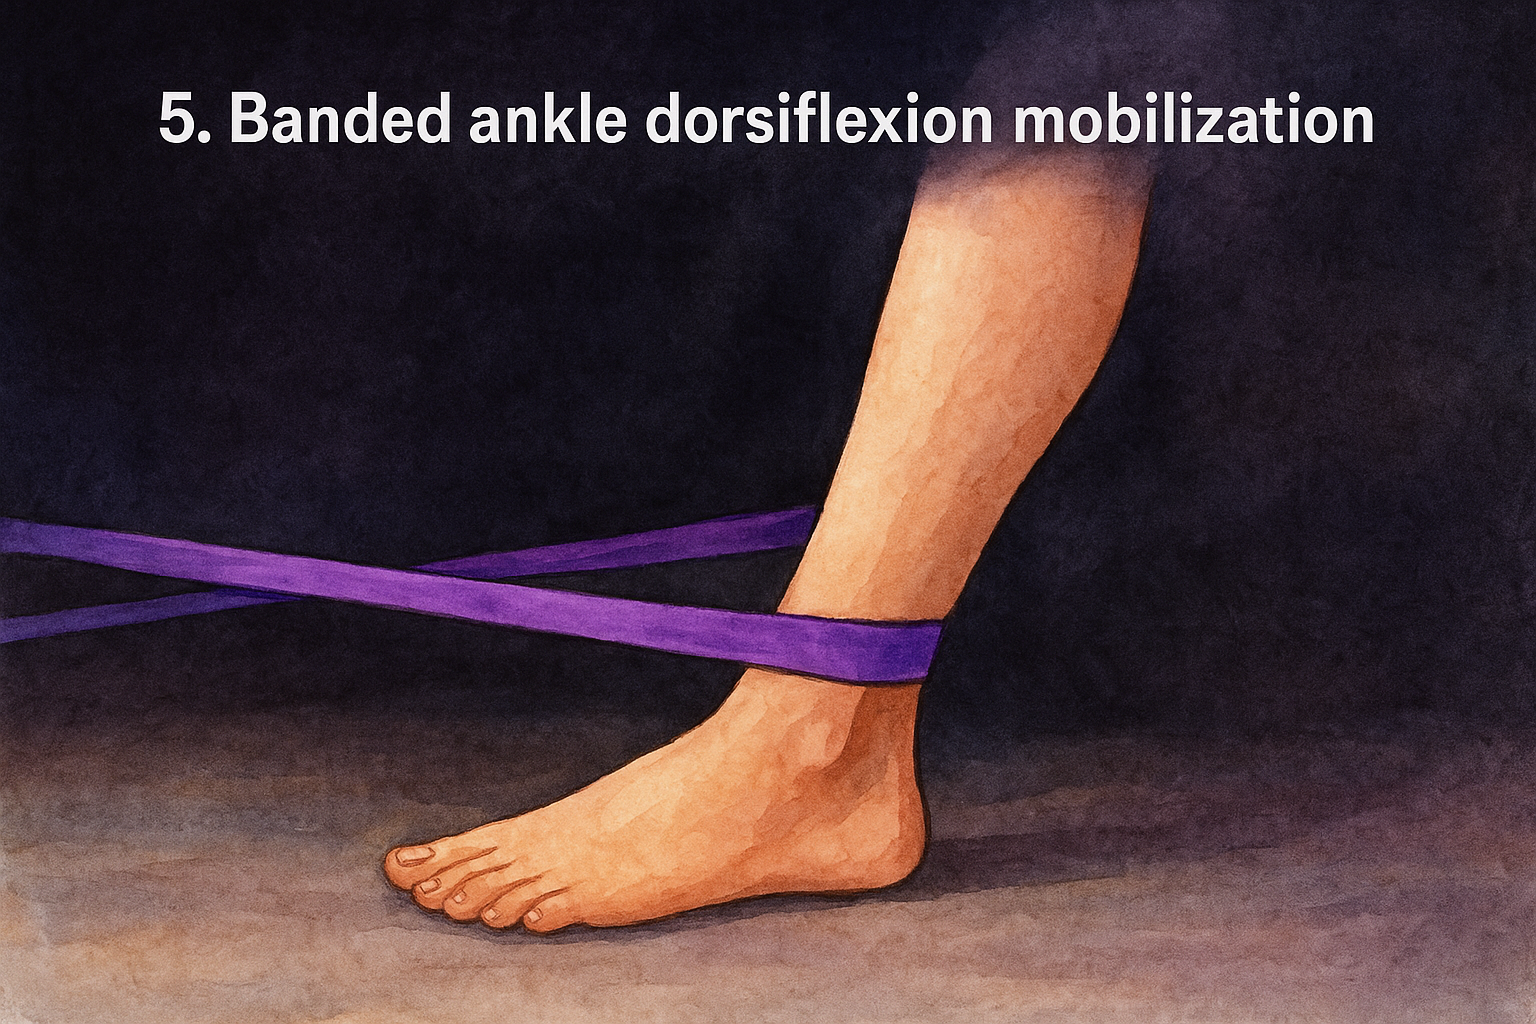
5. Banded ankle dorsiflexion mobilization
Adding a resistance band to your dorsiflexion drill changes the mechanics significantly. The band pulls the talus backward in the joint socket, creating space for your ankle to flex further than soft tissue stretching alone typically allows. This makes it one of the most targeted drills in any ankle mobility routine.
What it improves
This drill targets the joint capsule restriction that limits dorsiflexion, often the real culprit when calf stretches stop producing results. The band mobilizes the talocrural joint directly, restoring the natural glide of the talus rather than just lengthening surrounding muscles.
When soft tissue work alone stops improving your dorsiflexion, joint mobilization is usually the missing piece.
How to do it in 60 seconds
Anchor a resistance band low to the ground and loop it around your ankle just above the joint. Step forward until the band pulls horizontally backward on the ankle, then drive your knee over your toes for 30 seconds per side with your heel flat.
Form cues that matter
Your band tension should be firm, not slack, throughout each rep. Keep your heel pressed into the floor and let the band do the mobilization work while you drive your knee forward.
Common mistakes to avoid
Placing the band too high on the shin reduces its effect on the joint. Position it right at the ankle joint line so the force targets exactly where you need it.
Make it easier or harder
Use a lighter band if the tension pulls your foot out of position during the drill. Add a slow pulse at end range, holding each forward drive for two to three seconds, to increase intensity.
6. Single-leg balance with reach
Single-leg balance with reach closes out your ankle mobility routine by combining stability and controlled movement in one drill. Standing on one leg forces your ankle’s stabilizing muscles to work constantly, while reaching in different directions challenges your balance and range simultaneously.
What it improves
This drill builds proprioception and neuromuscular control around the ankle joint. It trains your ankle to stabilize your entire body under load, which transfers directly to uneven surfaces, long periods of standing, and dynamic movement like dancing or hiking.
Ankle strength without stability control leaves you vulnerable to sprains even when your range of motion is solid.
How to do it in 60 seconds
Stand on one foot and reach the opposite foot forward, out to the side, and behind you in a slow, controlled star pattern. Hold each reach for one to two seconds before returning. Perform for 30 seconds per side within the 60-second window.
Form cues that matter
Keep your standing knee slightly bent rather than locked. Your standing foot should stay flat on the floor throughout each reach, with no rolling to the inside or outside.
Common mistakes to avoid
Rushing through the reaches removes the stability challenge entirely. Each reach should be slow and deliberate, with your balance ankle working hard to keep you centered throughout.
Make it easier or harder
Use a wall for fingertip support if balance is a limiting factor. To increase difficulty, close your eyes during the reaches, which removes visual feedback and forces your ankle to work harder to stabilize.
Quick recap
Six drills, six minutes, and your ankles move better. This ankle mobility routine covers every angle: joint lubrication with ankle circles, active range work with toe-to-heel rockers, dorsiflexion-specific training with the knee-to-wall and banded drills, full-range calf strength with step heel drops, and stability control with the single-leg reach. Together, they address the most common restrictions that build up from sitting, dancing, hiking, or long hours on your feet.
You don’t need to do all six every day. Running through the full sequence two to three times per week produces real results over time. If one drill reveals a specific weakness, give it extra attention. Your ankles support everything above them, so the time you put in here pays off across your whole body. If you’re thinking about recovery more broadly, check out the Afterglow Recovery Protocol for a structured approach to physical and neurochemical restoration.
Lukas Nelpela
writes on neuroscience, mental health, and mindful exploration. With a passion in research-driven wellness and years focused on set & setting, integration, and recovery, he turns complex ideas into clear, usable insight.
You’re staring at your screen, reading the same sentence for the fourth time, and nothing sticks. Your thoughts feel like they’re wading through wet cement. So what is brain fog, exactly? It’s not a medical diagnosis, it’s a catch-all term for that frustrating state of mental cloudiness where focus, memory,
Every process in your body, thinking, moving, recovering, runs on energy produced inside your cells. That energy comes from mitochondria, and when they’re not functioning well, you feel it: brain fog, fatigue, slow recovery, and a general sense of running on empty. Mitochondrial support refers to the nutrients, habits, and
You sit down to focus, stare at your screen, and nothing clicks. Thoughts scatter, simple decisions feel impossible, and your mind moves like it’s stuck in wet concrete. If you’ve been looking up how to get rid of brain fog, you already know the frustration, that heavy, hazy state where
Working nights, rotating schedules, or pulling irregular hours throws your body’s internal clock into a constant state of confusion. Around 20% of the global workforce does some form of shift work, and the majority of those people report poor sleep as their number one complaint. Good sleep hygiene for shift
Sleep quality shapes how you think, feel, and recover, whether you’re bouncing back from a tough week or integrating a psychedelic experience. The Harvard sleep hygiene guidelines, developed by researchers at Harvard Medical School, remain some of the most cited and practical recommendations for improving rest. They’re not trendy hacks
We use various cookies on our website. Some are essential for the website to function properly, while others we may only use with your consent. You can find more information about cookies on our website here.
This website uses cookies to improve your experience while you navigate through the website. Out of these cookies, the cookies that are categorized as necessary are stored on your browser as they are essential for the working of basic functionalities of the website. We also use third-party cookies that help us analyze and understand how you use this website. These cookies will be stored on your browser only with your consent. You also have the option to opt-out of these cookies. However, opting out of some of these cookies may have an impact on your browsing experience.
Necessary cookies are absolutely essential for the website to function properly. These cookies anonymously ensure basic functionalities and security features of the website.
Cookie
Duration
Description
cookielawinfo-checkbox-advertisement
1 year
Set by the GDPR Cookie Consent plugin, this cookie records the user consent for the cookies in the "Advertisement" category.
cookielawinfo-checkbox-analytics
11 months
This cookie is set by GDPR Cookie Consent plugin. The cookie is used to store the user consent for the cookies in the category "Analytics".
cookielawinfo-checkbox-functional
11 months
The cookie is set by GDPR cookie consent to record the user consent for the cookies in the category "Functional".
cookielawinfo-checkbox-necessary
11 months
This cookie is set by GDPR Cookie Consent plugin. The cookies is used to store the user consent for the cookies in the category "Necessary".
cookielawinfo-checkbox-others
11 months
This cookie is set by GDPR Cookie Consent plugin. The cookie is used to store the user consent for the cookies in the category "Other.
cookielawinfo-checkbox-performance
11 months
This cookie is set by GDPR Cookie Consent plugin. The cookie is used to store the user consent for the cookies in the category "Performance".
CookieLawInfoConsent
1 year
CookieYes sets this cookie to record the default button state of the corresponding category and the status of CCPA. It works only in coordination with the primary cookie.
elementor
never
The website's WordPress theme uses this cookie. It allows the website owner to implement or change the website's content in real-time.
fb_event_id_atc
30 minutes
Used to match client and server events for Meta Conversion API deduplication. Contains only anonymous technical IDs; no personal data stored.
fb_event_id_ic
30 minutes
Used to match client and server events for Meta Conversion API deduplication. Contains only anonymous technical IDs; no personal data stored.
fb_event_id_pur
30 minutes
Used to match client and server events for Meta Conversion API deduplication. Contains only anonymous technical IDs; no personal data stored.
fb_event_id_vc
30 minutes
Used to match client and server events for Meta Conversion API deduplication. Contains only anonymous technical IDs; no personal data stored.
rc::a
never
This cookie is set by the Google recaptcha service to identify bots to protect the website against malicious spam attacks.
rc::c
session
This cookie is set by the Google recaptcha service to identify bots to protect the website against malicious spam attacks.
viewed_cookie_policy
11 months
The cookie is set by the GDPR Cookie Consent plugin and is used to store whether or not user has consented to the use of cookies. It does not store any personal data.
VISITOR_PRIVACY_METADATA
6 months
YouTube sets this cookie to store the user's cookie consent state for the current domain.
wpEmojiSettingsSupports
session
WordPress sets this cookie when a user interacts with emojis on a WordPress site. It helps determine if the user's browser can display emojis properly.
Functional cookies help to perform certain functions, such as sharing website content on social media platforms, collecting feedback, and other third-party functions.
Cookie
Duration
Description
sib_cuid
6 months
SendinBlue sets this cookie to store unique visits.
VISITOR_INFO1_LIVE
6 months
A cookie set by YouTube to measure bandwidth that determines whether the user gets the new or old player interface.
yt-remote-cast-available
session
The yt-remote-cast-available cookie is used to store the user's preferences regarding whether casting is available on their YouTube video player.
yt-remote-cast-installed
session
The yt-remote-cast-installed cookie is used to store the user's video player preferences using embedded YouTube video.
yt-remote-connected-devices
never
YouTube sets this cookie to store the user's video preferences using embedded YouTube videos.
yt-remote-device-id
never
YouTube sets this cookie to store the user's video preferences using embedded YouTube videos.
yt-remote-fast-check-period
session
The yt-remote-fast-check-period cookie is used by YouTube to store the user's video player preferences for embedded YouTube videos.
yt-remote-session-app
session
The yt-remote-session-app cookie is used by YouTube to store user preferences and information about the interface of the embedded YouTube video player.
yt-remote-session-name
session
The yt-remote-session-name cookie is used by YouTube to store the user's video player preferences using embedded YouTube video.
ytidb::LAST_RESULT_ENTRY_KEY
never
The cookie ytidb::LAST_RESULT_ENTRY_KEY is used by YouTube to store the last search result entry that was clicked by the user. This information is used to improve the user experience by providing more relevant search results in the future.
Performance cookies are used to understand and analyze key website performance indexes, which helps in providing a better user experience for visitors.
Cookie
Duration
Description
SRM_B
1 year 24 days
Used by Microsoft Advertising as a unique ID for visitors.
Analytical cookies are used to understand how visitors interact with the website. These cookies help provide information on metrics such as the number of visitors, bounce rate, traffic source, etc.
Cookie
Duration
Description
_clck
1 year
Microsoft Clarity sets this cookie to retain the browser's Clarity User ID and settings exclusive to that website. This guarantees that actions taken during subsequent visits to the same website will be linked to the same user ID.
_clsk
1 day
Microsoft Clarity sets this cookie to store and consolidate a user's pageviews into a single session recording.
_fbp
3 months
Facebook sets this cookie to display advertisements when either on Facebook or on a digital platform powered by Facebook advertising after visiting the website.
_ga
1 year 1 month 4 days
Google Analytics sets this cookie to calculate visitor, session and campaign data and track site usage for the site's analytics report. The cookie stores information anonymously and assigns a randomly generated number to recognise unique visitors.
_ga_*
1 year 1 month 4 days
Google Analytics sets this cookie to store and count page views.
_gcl_au
3 months
Google Tag Manager sets the cookie to experiment advertisement efficiency of websites using their services.
_hjSession_*
1 hour
Hotjar sets this cookie to ensure data from subsequent visits to the same site is attributed to the same user ID, which persists in the Hotjar User ID, which is unique to that site.
_hjSessionUser_*
1 year
Hotjar sets this cookie to ensure data from subsequent visits to the same site is attributed to the same user ID, which persists in the Hotjar User ID, which is unique to that site.
_hjTLDTest
session
To determine the most generic cookie path that has to be used instead of the page hostname, Hotjar sets the _hjTLDTest cookie to store different URL substring alternatives until it fails.
CLID
1 year
Microsoft Clarity set this cookie to store information about how visitors interact with the website. The cookie helps to provide an analysis report. The data collection includes the number of visitors, where they visit the website, and the pages visited.
MR
7 days
This cookie, set by Bing, is used to collect user information for analytics purposes.
sbjs_current
session
Sourcebuster sets this cookie to identify the source of a visit and stores user action information in cookies. This analytical and behavioural cookie is used to enhance the visitor experience on the website.
sbjs_current_add
session
Sourcebuster sets this cookie to identify the source of a visit and stores user action information in cookies. This analytical and behavioural cookie is used to enhance the visitor experience on the website.
sbjs_first
session
Sourcebuster sets this cookie to identify the source of a visit and stores user action information in cookies. This analytical and behavioural cookie is used to enhance the visitor experience on the website.
sbjs_first_add
session
Sourcebuster sets this cookie to identify the source of a visit and stores user action information in cookies. This analytical and behavioural cookie is used to enhance the visitor experience on the website.
sbjs_migrations
session
Sourcebuster sets this cookie to identify the source of a visit and stores user action information in cookies. This analytical and behavioural cookie is used to enhance the visitor experience on the website.
sbjs_session
1 hour
Sourcebuster sets this cookie to identify the source of a visit and stores user action information in cookies. This analytical and behavioural cookie is used to enhance the visitor experience on the website.
sbjs_udata
session
Sourcebuster sets this cookie to identify the source of a visit and stores user action information in cookies. This analytical and behavioural cookie is used to enhance the visitor experience on the website.
SM
session
Microsoft Clarity cookie set this cookie for synchronizing the MUID across Microsoft domains.
YSC
session
YSC cookie is set by Youtube and is used to track the views of embedded videos on Youtube pages.
Advertising cookies are used to deliver relevant advertisements and marketing campaigns to visitors. These cookies track visitors across websites and collect information to deliver tailored advertisements.
Cookie
Duration
Description
_rdt_uuid
3 months
Reddit sets this cookie to build a profile of your interests and show you relevant ads.
ANONCHK
10 minutes
The ANONCHK cookie, set by Bing, is used to store a user's session ID and verify ads' clicks on the Bing search engine. The cookie helps in reporting and personalization as well.
MUID
1 year 24 days
Bing sets this cookie to recognise unique web browsers visiting Microsoft sites. This cookie is used for advertising, site analytics, and other operations.
test_cookie
15 minutes
doubleclick.net sets this cookie to determine if the user's browser supports cookies.
yt.innertube::nextId
never
YouTube sets this cookie to register a unique ID to store data on what videos from YouTube the user has seen.
yt.innertube::requests
never
YouTube sets this cookie to register a unique ID to store data on what videos from YouTube the user has seen.